UART gateway
Introduction
UART gateway connects any device to the Internet via UART. Everything that your device sends to the UART, the gateway forwards to the Internet server - for example, AWS IoT, or Azure, or your own private TCP / Websocket backend. Likewise, everything that is sent to the gateway, gateway forwards to the UART.
The UART gateway could report to the BLE central, to the raw TCP server, to the Websocket server, and to the MQTT server. Also, it can accept an incoming TCP/Websocket connections. Thus it is very versatile in terms of the connection options.
UART gateway does not implement any logic whilst forwarding data to and from the UART. Data is transferred as-is, no modification happens in any direction. Message boundaries are determined by timing.
Authentication and encryption is provided by the TLS layer. The server side must be a TLS1.2 server with client-side authentication (mutual TLS) for the industry-standard level of security. AWS IoT is an example of such service.
Quick start
- Buy hardware mentioned on the Uart gateway page
- Connect hardware to your workstation via USB
- Follow steps 1,2,3 of mos setup
- In the
mosUI, runmos flash https://mongoose-os.com/downloads/uart-gateway/uart-gateway.zipcommand - Follow step 7 of mos setup
- Login to the license manager and buy uart-gateway licenses (one per device)
- Execute
mos license - Configure MQTT:
- For generic/private MQTT server, run
mos config-set mqtt.enable=true mqtt.server=HOST:PORT tu.mqtt.enable=true- For AWS, follow AWS guide's "Setup AWS IoT" and "Setup device" chapters
- For Google, follow GCP guide's "Setup Google IoT Core" and "Setup device" chapters
- For Azure, follow Azure guide's "Setup Azure IoT Hub" and "Setup device" chapters
- For Watson, follow Watson guide's "Quick setup" chapter
- For mDash, follow step 8 of mos setup
- Connect UART: pin 25 to TX, pin 26 to RX
When done, you should have your device flashed, provisioned to WiFi, connected to the cloud, and reporting UART data. Below is an example of the eval ESP32 Devkit-C board that connects a USB-to-Serial, making computer's serial device controlled via MQTT:
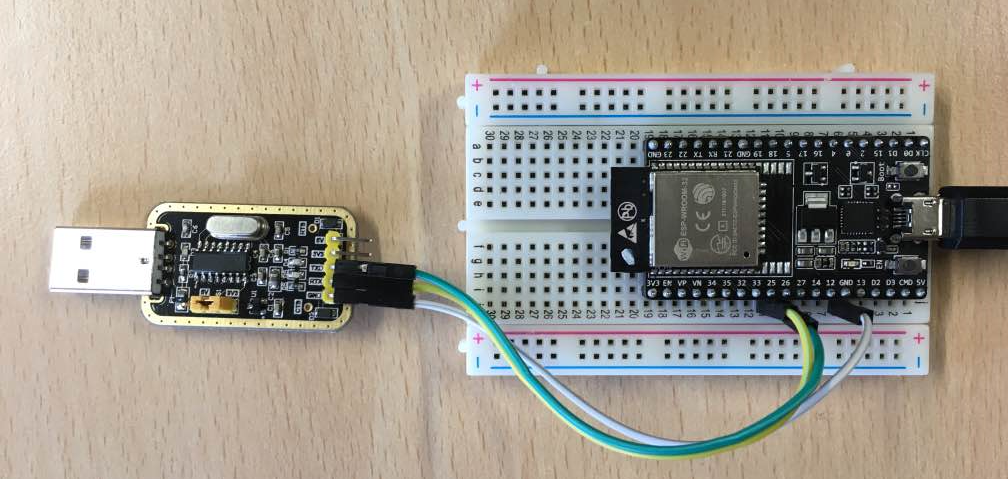
| USB-to-Serial converter | UART gateway on ESP32 Devkit-C |
|---|---|
| GND | GND |
| RX | IO25 |
| TX | IO26 |
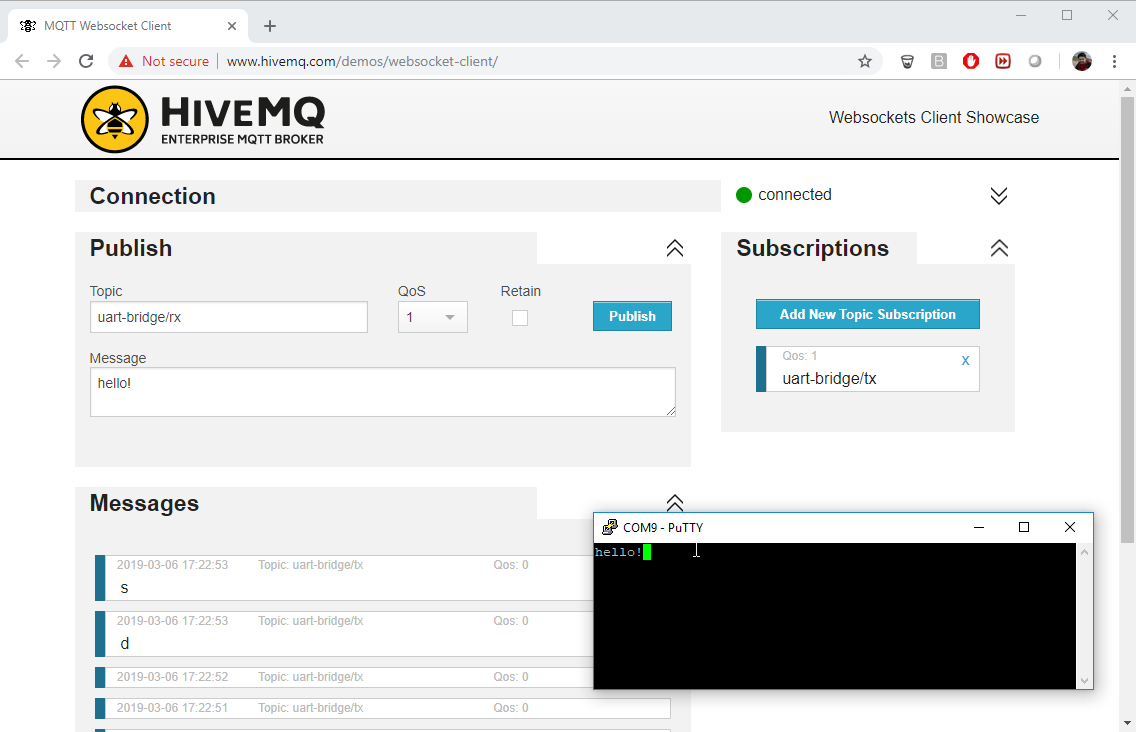
reporting data to the http://www.mqtt-dashboard.com:
Configuring UART gateway
UART gateway keeps its configuration on a flash filesystem. It could be instected
and changed using mos tool. To see an existing configuration,
execute mos config-get. Below is the documentation for relevant entries:
"tu": {
  "bt": {                           // BLE settings
    "rx_buf_size": 2048,            // BLE RX buffer size
    "tx_buf_size": 2048             // BLE TX buffer size
  },
  "evict_old": true,
  "mqtt": {                         // MQTT settings
    "enable": true,                 // Enable MQTT
    "qos": 0,                       // MQTT publishing QoS
    "rx_topic": "uart-bridge/rx",   // RX topic
    "tx_topic": "uart-bridge/tx"    // TX topic
  }
},
"tcp": {                            // TCP/Websocket  settings
  "client": {                                 // Client mode
    "reconnect_interval": 5,                  // Reconnection interval, seconds
    "remote_addr": "mongoose-os.com:443",     // Server HOST:PORT
    "tls": {                                  // TLS settings
      "ca_cert": "ca.pem",
      "cert": "",
      "server_name": "mongoose-os.com"
    },
    "ws": {
      "enable": true,                         // Enable websocket mode
      "protocol": "",
      "uri": "/uart-to-websocket/device/????????????"   // URI to connect to
    }
  },
  "evict_old": true,                // On device ID conflict, evict old entry
  "keepalive": {                    // Heartbeat settings
    "count": 10,
    "idle": 60,
    "interval": 6
  },
  "listener": {                     // Server mode settings
    "port": 8910,                   // Port to listen on
    "tls": {                        // TLS settings
      "ca_cert": "",                // CA certificate for mutual auth
      "cert": ""                    // Server certificate
    },
    "ws": {
      "enable": false               // Enable websocket mode
    }
  },
  "rx_buf_size": 2048,              // Receive buffer size, bytes
  "status_interval_ms": 1000,       // Status interval, milliseconds
  "tx_buf_size": 2048               // Transmit buffer size, bytes
},
"uart": {                           // UART settings
  "baud_rate": 115200,              // Baud rate
  "rx_buf_size": 1460,              // Receive buffer size, bytes
  "rx_fc_ena": false,               // Enable flow control
  "rx_linger_micros": 20,           // Microseconds to continue reading before sending
  "rx_throttle_when_no_net": true,  // Throttle when no network
  "status_interval_ms": 1000,       // Status interval, milliseconds
  "swap_rxcts_txrts": false,        // Swap RX / CTS and TX / RTS
  "tx_buf_size": 2048,              // Transmit buffer size
  "tx_fc_ena": false,               // Enable TX flow control
  "uart_no": -1                     // UART number, -1 to disable
}
In order to change any configuration parameter, execute mos config-set name=value, for example:
mos config-set mqtt.server=my.server.com:1883
mos config-set kiwi.pub_topic=my_cool_topic
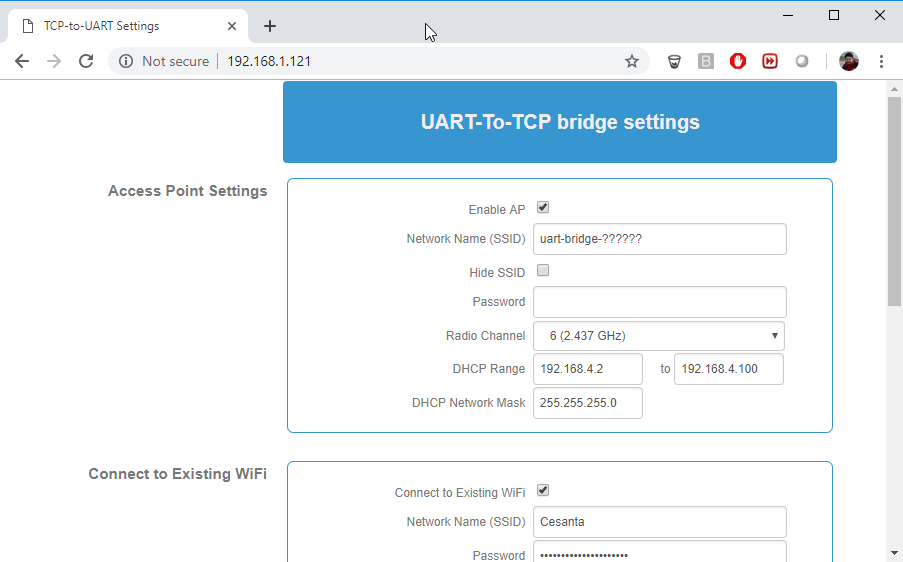
Web UI
UART gateway, when not configured, starts its own WiFi Access Point,
named uart-gateway-....... The gateway is accessible on IP address
192.168.4.1 in that network.
If WiFi station is configured, then the UART gateway does not start an access point.
In any case, UART gateway runs a Web UI on port 80, allowing to setup tunable parameters over the easy-to-use interface:
 edit this doc