MakerFactory board + Mongoose OS
This tutorial demonstrates how to use Mongoose OS on MakerFactory ESP32 development board, and use Google IoT core as a cloud backed to control the board and report metrics.
Setup the board and Google IoT Core
Please follow Google IoT Core tutorial in order to setup the cloud side and provision your board to Google IoT Core. You need to complete Setup Google IoT Core and Setup device sections only. When done, continue on this tutorial.
NOTE: before executing mos flash command, press and hold
IO0 button on the board in order to enter programming mode. That needs
to be done every time you flash the board.
HINT FOR THE MANUFACTURER: in order to omit manual button press, modify USB-to-Serial adapter wiring by connecting DTR to GPIO0 and RTS to RESET. See notes from Espressif at https://github.com/espressif/esptool/wiki/ESP8266-Boot-Mode-Selection#automatic-bootloader
Controlling LED via Google IoT Core
Open fs/init.js in your favorite editor, copy-paste the following snippet and save:
load('api_config.js');
load('api_gpio.js');
load('api_mqtt.js');
load('api_neopixel.js');

let strip = NeoPixel.create(33, 2, NeoPixel.GRB);
strip.clear();

let topic = '/devices/' + Cfg.get('device.id') + '/config';
MQTT.sub(topic, function(conn, topic, msg) {
  print('Topic:', topic, 'message:', msg);
  // Expected config format: {"led": 0, "r": 123, "g": 123, "b":123}
  let obj = JSON.parse(msg) || {};
  strip.setPixel(0, obj.r || 0, obj.g || 0, obj.b || 0);
  strip.show();
}, null);
The snippet above initialises RGB LED strip, and subscribes to the
/config object notifications. Once the config object is sent to device
by Google IoT Core, the handler function is called and lights the
corresponding LED.
In the command prompt (or terminal on Linux/Mac), enter the following commands
to copy init.js to the device, reboot the device, and start monitoring
serial output:
mos put fs/init.js
mos call Sys.Reboot
mos console
Find a registered device in a Google IoT Core device registry. Click on "Update Config" button, and in the opened dialog, enter the following configuration and hit "SEND TO DEVICE":
{"r": 50, "g": 0, "b": 0}
Note how one of the LEDs turns red. Enter
{"r": 0, "g": 0, "b": 0}
Note how the LED turns off.
Important thing to note: Google IoT Core send device config object each time device comes online or a config change is made. That means, that if you power cycle the device, it'll sync its LED state with the cloud as soon as it gets connected.
Reporting state to Google IoT Core
We are going to connect a Grove DHT temperature sensor to the board,
then modify fs/init.js to periodically read the temperature and send
it over to the Google IoT Core.
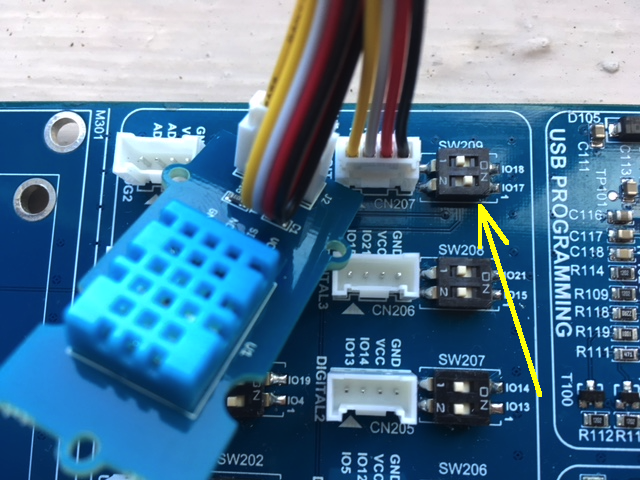
Get the Grove DHT sensor and connect it to the IO17 Grove connector on the board, as shown on the picture. Make sure to enable IO17 via the switch, as shown on the picture.
The DHT driver is built-in to the demo-js app we're using, therefore
we do not need to rebuild the firmware.
Open fs/init.js in your favorite editor, copy-paste the following snippet and save:
load('api_config.js');
load('api_dht.js');
load('api_mqtt.js');
load('api_timer.js');

let topic = '/devices/' + Cfg.get('device.id') + '/state';
let pin = 17;  // GPIO pin which has a DHT sensor data wire connected
let dht = DHT.create(pin, DHT.DHT11);  // Initialize DHT library

Timer.set(3000 /* milliseconds */, Timer.REPEAT, function() {
  let t = dht.getTemp();
  let h = dht.getHumidity();
  if (isNaN(h) || isNaN(t)) {
    print('Failed to read data from sensor');
  } else {
    let msg = JSON.stringify({temperature: t, humidity: h});
    print(topic, '->', msg);
    MQTT.pub(topic, msg, 1);
  }
}, null);
In the command prompt (or terminal on Linux/Mac), enter the following commands
to copy init.js to the device, reboot the device, and start monitoring
serial output:
mos put fs/init.js
mos call Sys.Reboot
mos console
In the Google IoT Web console, click on the "Configuration and state history", and see how new state objects are arriving. Click on any state object, select "text" view, and check the JSON string that is sent by device.
edit this doc